Lesson 2: Site Assessment
Learner Outcomes
Students will determine how to identify existing and potential areas of erosion and sedimentation on their school campuses. They will collectively work to create an experiment to test erosion and sediment control.
Success Indicator
Assess surroundings for evidence of erosion and sedimentation.
Skill Level
Advanced; ages 14-18
Time Needed
One 90-minute class or two 45-minute classes
Life Skills
Communication, Teamwork, Leadership, Contributions to Group Effort, Decision Making, Critical Thinking, Problem Solving
Materials
- Lesson Two Slides
- Copies of Site Assessment handout
- Copies of the Rainbox Throwdown handout
- 1 Rainbox (see directions at the end of the lesson)
- Clayey soil to fill volume of rainbox space – approximately 33 lbs of soil (½ of a 5-gallon bucket) packed consistently throughout the box will achieve an overall bulk density of 1.5g/cm3.
- 1 watering can
- 1 container to capture rainbox runoff (like a 10-gallon storage container)
- 5 digital cameras
- Video camera (optional)
Lesson Slides
Lesson Slides
Click on “File” and then select “Make a Copy ” of the lesson one slide deck to use it with your youth.
Introduction
Background Information
Soil erosion occurs when the surface flow of water from rainfall moves across bare soil. Soil particles are detached and transported downslope. Erosion begins when the soil is saturated and the water can no longer infiltrate the soil surface. Soil erosion depends on a number of factors:
- Soil texture and structure
- Slope steepness and length
- Impervious surfaces: parking lots, sidewalks, roads, rooftops, tennis courts, basketball courts, etc.
- Landscape management: established vegetation, contours, mulch, foot traffic patterns
- Rain intensity and volume
Unfortunately, soil erosion is ubiquitous, in both urban environments with intense land development (roadways, commercial buildings, and housing construction) and continuously farmed agricultural lands that use improper practices. Numerous signs of erosion are easily observable: muddy water, areas with bare soil, visible subsoil, soil splash on the sides of buildings, sedimentation at the bottom of a slope, storm drains covered by sediment, rills, or gullies, and possibly even sinkholes.
Rills
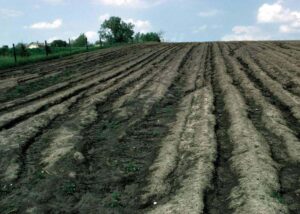
Rills are small channels in the soil resulting from the flow of concentrated stormwater runoff. Rills tend to be small and shallow and can be remedied by normal tillage, but when left alone can develop into gullies. Rills increase in size with greater runoff flow and slope length. Rills are created by concentrated volumes of water eroding away the soil from the base of a slope. The erosion continues as the rill works its way up the slope. Rills erode deeply until the soil is removed to a soil layer that has a lower susceptibility to erosion. The rill will then widen and erosion rates will decrease.
Gullies
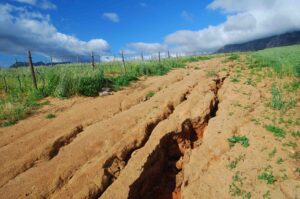
Gullies are large, deep channels formed as a result of the soil being removed by stormwater runoff. Rills, if left unattended, form gullies. Rain flow scours the gullies, causing undercutting and sidewall collapsing and increased soil loss. Gullies disrupt agricultural and construction activities because they require significant resources in the form of heavy machinery to repair damaged areas. To stabilize a gully, water flow needs to be diverted and soil brought in to fill the channels.
Daily Blog Breakdown
Begin the class period by taking time to review the blog posting from the previous day. Ask a student to share a post, highlighting thoughtful contributions and the measures students employed that result in a good post, like the inclusion of photographs, well-written descriptions, or links to insightful articles or websites (refer to blog rubric located at the end of Lesson One).
Have students discuss what they liked about blogging and what was most difficult.
- What kinds of new skills did they discover as they were composing their blog posts?
- What did the students learn about communicating with others?
- How will learning to write and blog help in other parts of their lives?
Tell students that today they will be taking their own photographs and videos (optional) to include as part of the blog.
Site Assessment
Experience: Site Assessment
Give students five minutes to answer the following questions:
- What are some visible signs of soil erosion?
- What factors contribute to soil erosion?
- What is the difference between a rill and a gully?
- Can you think of a way to prevent rills and gullies from forming?
Explain that they will be walking around the school campus to identify visible spots of erosion or risks that increase the potential for erosion. Ask the students what evidence they might observe that would indicate there is a soil erosion issue. Students might suggest bare soil, rills, gullies, or sedimentation (see sidebar). Ask students to think deeper about the landscape features they might observe that would increase the potential for erosion?
Walk around the school grounds and allow students to work in their groups to identify soil erosion sites and to document their findings through descriptive notes, photographs, and video and using their handout.
Signs of soil erosion
- bare soil
- rills
- gullies
- exposed subsoil
- sinkholes
- sedimentation
- soil splash
Path for stormwater runoff
- waterways, streams, rivers
- storm drains
- parking lots
- roadways
- rooftops
Have the students find and follow storm drains to a nearby waterway. Explain that stormwater runoff is not treated (it does not flow to a wastewater treatment plant), but instead flows directly into the watershed. Nutrients, like nitrogen and phosphorus, and other pollutants, like pesticides, oils, and other residues may be adsorbed onto the soil particles and enter the water. Have students recall that sediment is the number one pollutant in our waterways due to its ability to carry nutrients and other pollutants along the way.
Return to the classroom and have the students report on their findings using their handout on the “Talking it Over” section. Ask them if they had ever noticed soil erosion on the school grounds before. Inquire if they have seen similar evidence around their own neighborhood and surrounding community. Ask them to describe these areas and comment on how the land ended up in its eroded state. Improper human management of the land is usually responsible for much of the erosion that can be observed. Inappropriate land development (roadways, commercial buildings, and housing construction) and improper agricultural practices are two primary ways in which land management might cause soil loss.
Follow up with the Site Assessment by showing students the Lesson Two Slides. Use the notes on the presentation to explain highlights for each photo. This is a useful tool when your site may have limited erosion and sedimentation examples. Have the students point out similar findings from their own walk around the school.
Site Assessment
Provide your students with the site assessment handout.
Site Assessment Jamboard
Use this jamboard to engage youth in sharing the evidence they found on their site assessment.
Teachers / Leaders: Please click the three vertical dots in the upper right-hand corner and select “make a copy.” Save your own copy to use with your youth.
Talking it Over
Site Assessment
Share … what you did
- What visible signs of erosion did you see? Describe what the signs looked like.
- What was the most interesting part(s) of the site assessment?
Reflect …on the results
- Based on your experience, how do you think the erosion or sedimentation happened?
- Based on your experience, what types of communication did you use as a group to share your observations?
Generalize …to your community
- Based on your experience, have you observed soil erosion in your own neighborhood or community? Explain.
- Why do you think this experience was important?
- Where can you go to find more information you may need to understand erosion?
Apply …to your community
- Based on the knowledge you have gained from this experience, how do you think we should best manage erosion and sedimentation?
- Based on your knowledge developed from working as a team, how could you apply these new skills at home?
Rainbox Demonstration
Experience: Rainbox Demonstration
Have a rainbox already prepared to demonstrate to the students the effects of rain on bare soil. Fill the rainbox preferably with a clayey soil that is dry or has low moisture (NOTE: to dry out the soil, leave it in the sun for a week or two). You will need approximately 30 lbs of soil or about half of a 5-gallon bucket.
Pack the soil in the box so that it is flush with the overflow edge on the soil box. The water will infiltrate the soil before running off and provide a point for discussion. Soils have to reach saturation before runoff/erosion will occur.
Have students make hypotheses about what they think will happen. “When it rains, what will happen to the soil?” “Where will the soil go?” “What will the runoff water look like?” “How does runoff impact water quality?”
Nominate a student to “rain” on the soil using a full watering can. Have the student hold the watering can at a consistent height (about 3 feet above the rainbox) and evenly water up and down the rainbox until the watering can is empty. Make sure that the drainage tube at the bottom of the rainbox stays clean and free of debris as water and soil are flowing through it.
Have a couple of students take photographs of the process to use later in their blog postings. Collect a sample of the runoff water.
Return to the classroom and encourage students to share their thoughts on what they observed happening. Ask them:
- What did you learn by observation?
- What happened to the soil?
- Where did the water go?
- What kind of soil was in the box, and did this matter?
- How could you stop the soil from eroding?
Ask them to visually evaluate the water sample that was collected from the rain box.
- What color is the water?
- What might the color of the water tell us?
- What do you see in the water?
- Do you think the slope of the box made a difference in the amount of erosion that occurred?
- What happens to the water quality when our waterways turn this color?
Explain to students that the single most important way to limit soil erosion is to establish a vegetative cover on bare soil. Vegetation, whether grass, tree canopy, or herbaceous plant material, serves several purposes:
- Minimizes the physical impact of a raindrop as it strikes the soil surface.
- Reduces the velocity of the water as it flows across the landscape.
- Improves infiltration as a response to root growth.
- Improves soil structure as a response to root growth.
Different types of vegetation have advantages and disadvantages. Grass is a predominantly used material because it germinates quickly, is inexpensive to seed large areas it forms a dense root mass, and provides cover throughout the year. Trees can provide beneficial cover from a leafy canopy as well as leaf litter on the ground, but they are slow to grow, may lose leaves in the winter, and are expensive to establish.
Experience: Rainbox Throwdown
Issue the Rainbox Throwdown. Explain that each group will be given a rainbox and they have to create a solution to limit the amount of soil leaving the rainbox. The group with the clearest water and least amount of sediment in their runoff samples wins. The runoff samples will be evaluated and provide the measure by which victory can be declared. Students can implement any idea they think will work. Each group will use a standard rainbox (instructions for building a rainbox can be found in the Appendix), filled with equal volumes of the same soil type and set at the same slope, and use the same amount of “rain.” In the next lab, they will learn more about basic soil properties and how they play a role in erosion.
- Begin the brainstorm by collectively developing the questions they will be answering. Some possibilities might be:
- What is the best way to prevent soil erosion?
- How can soil erosion be minimized?
- What practices produce the cleanest runoff from a site?
- Using the Rainbox Throwdown Lab handout, students should come up with a hypothesis, a list of materials, and their methods for implementation.
- Suggest that students use items they have access to at home or at school. If the resources are available, the teacher might provide some of the materials.
- Let the students think of their own ideas, but some common materials to consider might include mulch, straw, leaves, rocks, fabric, gravel, or metal screens.
- As students are planning, the teacher should float around to each group and listen to its ideas, offer suggestions, ask questions and verify that the list of materials can be easily obtained.
- Students should bring all materials needed to the class when Lesson Four is being conducted to implement their ideas.
- You may need to remind the students that the end goal is vegetation establishment. The grass will not grow nor will seeds germinate if the soil is covered with things such as plastic, umbrellas, large stones, etc.
Rainbox Throw Down
Who can come up with the best management practices for keeping soil on site and out of our waterways? See how these 4-H’er implemented their rainbox throw down challenge!
Setting up the rainbox
Learn how to set up your rainbox with the right materials and soil. What happens when rain hits bare soil? Does it go into the soil? Does it runoff? What happens if it runs off? Watch our Pasquotank 4-H’er give a short demonstration of rainfall on bare blacklands soil.
Rainbox Throwdown: Round Two
Find out what materials Will used on his rainbox. Did it stop soil from washing away? What will you use to limit soil erosion with your rainbox?
Rainbox Throw Down Slides or PDF
Make a copy of the “Rainbox Throw Down Digital Lab Notebook” to use with your students or download a copy of the PDF handout.
Assessment
Assessment: Tell and Toss
This assessment (adapted from Keeley, 2008) is an anonymous way to gather the different ideas that students have developed about erosion so far. Students are given the question in the table below.
- Students write their answer and explanation on a piece of paper and then crumple it into a ball.
- Upon receiving a signal from the teacher, have the students begin tossing the balls of paper around the room.
- After telling the students to stop tossing, they pick up a paper closest to them and give them a few minutes to read the response written.
- Take a quick poll to see the responses that were given.
- Have students work in small groups to discuss the ideas and thinking that are described on the papers and report to the class.
- Once all the ideas have been shared and listed, students can share additional thoughts and justification for their thinking.
- Ask the students if they are keeping their original answer.
- Ask for a show of hands of which students are modifying their original response.
This activity commits students to their idea and gives them a chance to see what their peers are thinking. It shows them that a “wrong” idea can be a useful learning tool as much as a “right” answer.
The bleachers by the football stadium are set into a hill. When it rains, there are always huge muddy puddles around the base of the bleachers. Why do you think this is happening?
Explain your thinking. Describe the answer(s) you selected. |
The Daily Blog
Assign one to two students per group to blog about the day’s experience and additional questions and thoughts they have. The teacher should upload the photos daily and make them available to the students through an online photo website.
Learn More
Learning More
Many states have some kind of community conservation programs through the local Soil and Water Conservation Districts (SWCD) designed to improve water quality through stormwater management in urban areas. The local SWCD works with homeowners, schools, churches, community groups, and businesses to install best management practices to treat polluted stormwater runoff. This effort will help to promote healthy clean waterways. Practices include converting impervious surfaces to permeable pavement, installing bioretention areas or rain gardens, creating backyard wetlands, planting grassed swales, and establishing riparian buffers, to name a few. Some states offer financial assistance through grants to support the implementation of these practices. Students can submit an application for educational, financial, or technical information to the local Soil and Water Conservation District to repair any eroded sites on the schoolyard or to eliminate areas that contribute to stormwater runoff.

