Lesson 4: Microbes in Our Water
Youth use microscopes to observe and identify microbes in local water samples.
Key Teaching Points
- A variety of microbes are found in water sources.
- The type of water environment will determine the variety of microorganisms found there.
Learner Outcomes
- Identify microorganisms in water sources.
Skill Level: 6-8th grade
Success Indicators
- Participants will collect water samples.
- Participants will identify the microorganisms found in the water sample.
- Participants will gain an understanding of the diversity of microorganisms found in water sources.
- Participants will compare water samples and the diversity of microorganisms from different water samples.
Life Skills
Teamwork, Critical Thinking, Communications, Contributions to Group Efforts, Marketable Skills, Disease Prevention, Problem Solving
Time Needed
1-2 days
Space
- Outdoor area with a water source (pond, lake, stream) to collect samples
- Classroom space to complete the testing and identifying of microbes
Suggested Group Size
4-5 participants in a group
Materials
Materials List
For the class
- Technology to present the presentation to the class
- Microbe Data Sheet (1 per participant)
- 1 empty clear jar (mason or baby food jars work well)
- Sample of water from a local water source (pond, river, stream)
Note: Try to get a sample that looks to be “clear with nothing in it”
For Each Group
- 1 empty baby food jar or another small clear jar with lid (cleaned and label removed)
- Microscope Lab Procedures (1 per group)
- Hand lens
- Microscope (if available)
- Microscope slides
- Coverslips for microscope slides (one slip needed per slide). [Optional: additional slides may be used in place of coverslips.)
- Pipette (dropper)
- Alcohol swabs to clean the eyepiece between each participant
- Slide cleaning materials to use after the lab if the slides will be reused
- Options: soap and water, glass cleaner, alcohol spray, or lens cleaner AND paper towels, tissues, or lint-free tissues
- Optional: Water Testing kit can be used to expand the discovery of the water sample
This learning activity can be completed with or without microscopes, depending on what resources are available.
Introduction
Introduction
Microbes are found all over our world, including in the water. The microbes found in water tell us a great deal about the quality of the water and the organisms that live in it. In some cases, a water system is considered healthy if diverse groups of microbes can be found living in it. On the other hand, sometimes the presence of a particular microbe can indicate that this water system is not a healthy body of water for certain organisms to call home. In this lesson, participants will explore the different types of microorganisms found in water samples and compare their findings to other samples of water.
Up to a week prior to the activity
- Determine where participants will collect water samples. One water source may be used, or each group may collect water from a different source.
- Inform the participants and their parents or guardians that they will be outside collecting water samples on the scheduled date. Collect permissions as necessary.
Day before the activity
- Make sure the weather will permit outside activity.
- Remind participants that they will be outside the following day and to dress accordingly.
- Collect a sample of water from a local water source (pond, river, stream). This can be one jar for the whole group or multiple to pass around. Make sure the sample is in a clear container (Mason jar, baby food jar). Try to get a sample that is fairly clear and looks as if nothing is present in the water sample.
Day of activity
- Prepare technology to show the presentation to the class.
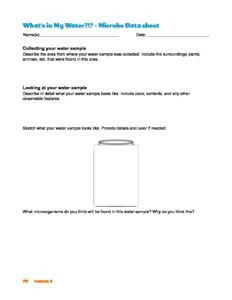
- Prepare copies of the Microbe Data Sheet (one per participant).
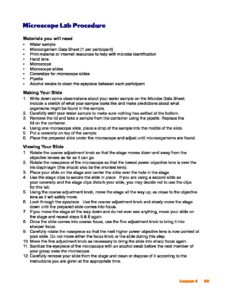
- Prepare copies of the Microscope Lab Procedures (one per group).
- Set up the materials for each group:
- Small clear jars to collect water samples
- Microorganism Data Sheet (1 per participant)
- Microscope Lab Procedures (1 per group)
- Any print material or internet resources to help with microbe identification (see links for suggested resources)
- Hand lens
- Microscope (if available)
- Microscope slides
- Coverslips for microscope slides
- Pipettes
- Alcohol swabs to clean the eyepiece between each participant
- Set up one or more slide cleaning station(s) with the cleaning supplies you have chosen if slides will be cleaned and reused.
Note: If participants are unable to collect water samples as a class, the facilitator may prepare samples for each group, or the facilitator may request that participants bring in water samples from home. Pond water samples can also be ordered through science companies if needed.
Part 1
Opening Questions
-
What do you think is in the water in the jar?
-
Is your answer the same after inspecting the water with a hand lens?
Follow-up Question
-
Have any of you ever gone swimming in a pond, river, lake, ocean, or another place that was not a swimming pool?
Part 1: Let’s Do It!
-
Allow participants to inspect the container(s) of water. Do not tell participants where the sample(s) came from. Have them describe the water sample to you.
-
Ask the first Opening Question.
-
What do you think is in the water in the jar?
-
-
Encourage participants at this point to use the hand lenses to explore the water through the container. They should be able to observe small microorganisms moving around in the water.
-
Ask the second Opening Question.
-
Is your answer the same after inspecting the water with a hand lens?
-
-
Ask the Follow-up Question.
-
Have any of you ever gone swimming in a pond, river, lake, ocean, or other places that were not a swimming pool?
-
-
Discuss how microorganisms are found in many different water sources.
-
Show the presentation to help participants understand the role microorganisms play in a water source.
-
Explain to participants they will be collecting water samples to observe microorganisms.
Collection of water as a class
- Instruct each group to bring at least one copy of the Microbe Data Sheet to record data from the collection location.
- Give specific instructions for the location from where each group will collect samples.
- Once at the desired location, direct participants to take the collection container and dip it into the water source and fill it up as much as possible. It is okay if some dirt/debris gets into the sample. Participants are to try to get the water sample from an area where they think there will be a variety of microorganisms.
- Once the samples have been collected, participants will place the lids on the containers.
- On the Microbe Data Sheet for each group, participants will take some brief notes about the area from where the sample was collected.
- Return to the classroom/activity area to complete the next part of the activity.
Part 1 Assets
Part 2
PART 2: Participant Lab Procedure
- Direct participants to move into their small groups.
- Participants will write down some observations about their water sample on their Microbe Data Sheets. They will also include a sketch of what their sample looks like and make predictions about what organisms might be found in the sample.
- Participants should carefully swirl their water samples to make sure nothing has settled at the bottom.
- Participants will remove the lid and take a sample from the container using the pipette and then replace the lid on the container.
- Using one microscope slide, participants will place a drop of the sample into the middle of the slide.
- Participants will cover the sample with a coverslip or an additional slide.
-
Participants will place the prepared slide under the microscope and adjust until microorganisms are found.
Note: If microscopes are not available, samples can still be taken and placed on a slide and observed with a hand lens. They can also be observed using a hand lens in the container.
-
Help participants try to identify the microorganisms observed under the microscope using the provided links.
Pond Life Identification Kit – Microscopy-uk.org
Pond Life handout – From Utah Agriculture in the Classroom
Pond Identification Sheet – biologycorner.com
Guide to Identification of Fresh Water Microorganisms – Math/Science Nucleus
-
Participants will complete the observation pieces (through page 2) about the microorganisms found in the water sample in the appropriate spaces provided on the Microbe Data Sheet.
-
Allow participants to go around the room and observe the water samples collected from other groups. Have them compare to see if they found similar or different microorganisms that were found in the other samples.
-
Direct participants to complete the Comparing Microorganisms page of the Microbe Data Sheet.
-
Conduct a whole-class discussion. Ask participants from different groups to describe and identify the microorganisms found in their samples.
-
Once participants are done with the samples they may be disposed of outside or back into the area from where they were collected. Containers can be washed and reused or discarded.
-
Direct participants to clean their microscopes and slides and complete any other housekeeping duties required at the end of the microscope lab.
Part 2 Assets
Dig Deeper
Have your youth complete the writing prompt
- Tell the story of a microorganism that is living in a stream or ditch near your house. How does it move? How does it eat? Connect it back to some of the microorganisms you found in your water sample.

