Lesson 2: Soil and Water Relationships
Purpose
Using skills of observation, comparing, classifying, and communicating, students will discover the different characteristics of soil and how soil properties impact their daily life. They will explore the relationship between soil type and water.
Time Needed
45 minutes, two week preparation time
Materials
- 30 empty, rinsed 20 oz. clear soda bottles* (top cut off and holes drilled in the bottom) or empty tennis ball containers
- 30 cups marked with ¼, ½, ¾, and 1-cup measurements
- Different soils, enough to partly fill each soda bottle container
- 30 plastic cups marked with a 1-cup line
- 1 clock or stopwatch
- 1 sponge
- A clear bowl filled with water
*Soil Drainage Container: Take your empty 20-ounce soda bottle, and cut off the top just above the shoulder of the bottle. Drill about five holes of the same size in the bottom. For fine soils like dry sand, you may need to nestle cheesecloth or fine mesh fabric in the bottom of the bottle. Alternatively, you may use empty tennis ball containers and drill holes in the bottom
Background information
Soils have different porosity levels, which depend on soil structure (aggregation) and texture (particle size). Typically, the larger the particle, like sand, the larger the pore space and the easier it is for water to drain through. The smaller the particle, like clay, the longer it takes for water to drain through. Plants depend on water in order to grow.
The soil that a plant is growing in will control the amount of water that is available to plants. Soils that have been disturbed or compacted will tend to have smaller pore spaces. Humus (decomposed organic material) is important in soils because it helps soil aggregate or clump, which allows air and water to pass through. Certain plants have adapted to grow well in particular soils. For example, native plants growing on the coast can tolerate the dry sandy soils found there.
Focus Questions
- How well do different soils hold water?
- How does water in the soil impact plant growth?
- Why are some soils more likely to flood?
Lesson Slides
Lesson Two Slides
Click on “File” and then select “Make a Copy ” of the lesson two slide deck to use it with your youth.
Scratching the Surface
Instructions
Ask the students to recall the soil particle play. Remind them that the spaces between the soil particles are filled with a mixture of water and air depending on the environmental conditions. Use a sponge as an example. Hold up a large dry sponge and ask the students what is in all the holes? They should answer air. Dunk the sponge into the water and squeeze; the student should see air bubbles come to the surface.
Lift the sponge out of the water and tell the students the sponge represents soil saturated with water, like right after a rain.
Ask students why there is standing water in some yards after it rains? Some soils have slow infiltration rates of water.
Lift the sponge out of the water and let it drain on its own. The water that drains out is in the macropores and represents the water available to plants. Gently squeeze out most of this water. This is the water that fills the medium-sized pore spaces.
Pass the sponge around and ask if it is still wet. The water still present in the sponge represents the soil micropores, smaller spaces between the soil particles. This water drains out more slowly and is somewhat available to plants. As the soil dries out, however, it becomes harder for the roots to take up water
Digging In
Instructions
To test the differences in water infiltration and permeability by the soil, begin with clear soda bottles (or similar plastic containers) with holes drilled into the bottoms. Divide the class into teams of three, and give each student a cup of different soil. Use soils collected from the schoolyard, or work with your local county Extension agent to obtain different soil samples. Soil samples should be dry. To dry soil, lay them out on a tray on a sunny windowsill for a week or two. Each student sample should be different.
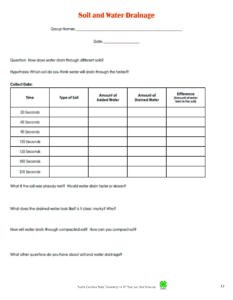
For example, in a group of three, one member may have clayey soil, another sandy soil, and the third a loamy or silty soil. Have the students put the same amount of soil (about 2 cups or more) into a bottle and then fill their glass with a cup of water to the one-cup mark. Using the soil and water drainage sheet, ask the guiding question, “how does water drain through different soils?” Have the students write down a hypothesis about what they think will happen.
Next, have students make a hypothesis about which soil water will travel through the fastest. Using a classroom clock or stopwatch, start at the same time and have students simultaneously pour their water into the three soils and observe how fast the water drains. After 30 seconds, observe how much water drained into the cup. Have students record their measurements on their worksheets. Continue observing the water drain through the soil. Measure at 30-second intervals until most of the water has drained.
Have groups discuss with each other some of the following points:
- Which soil drained the fastest?
- Which drained the slowest?
- What does the water look like from the drained soils?
- What happens if we use compacted soil?
- What if the soil is already wet?
- Can we change the structure of the soil? How?
- What is the relationship of water drainage in the soil to plant growth?
- Compare the total water quantity that drained with the amount added. Which soil retained the most water after drainage stopped? Why?
- Which soil has the most total porosity?
Soils Solutions Lesson 2 – Digging In Video
This video is for teachers to review what students will learn about the porosity of soils.
Soil and Water Drainage Student Data Sheet
Use this student handout to measure how water drains through different soil types.
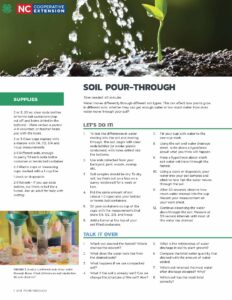
Soil Pour Through Lab
Give this handout to youth working at home to do the soil and water drainage lab.
Assessment
Soil Water Concept Sentencing – Instructions
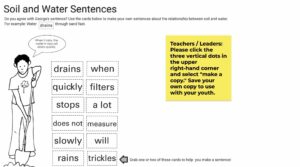
Give students keywords or pictures on cards that they will use with words of their own choosing to create sentences about the relationship between soil and water. Have the entire class generate a consolidating conversation on soil and water relationships. Use the resulting conversation to assess learning. (NC Language Arts Competency: 4.02) If you have not done concept sentencing before, begin with a simple topic and demonstrate concept sentencing to your class. For example, start with the topic of soil and water relationships.
Sample Words
- drains
- quickly
- slowly
- stops
- a lot
- does not
- will
- rains
- when
- measure
- trickles
Sample Sentence
The sandy soil will drain quickly after it rains.
The students come up with the words sandy soil. The students can also help you come up with words that can be used in the concept sentencing. To assess soil and water relationships print the worksheet or use the soil and water jamboard
Soil and Water Concept Sentencing Jamboard
Assess your student’s understanding by having them create sentences that show the relationship between soil and water.
Teachers / Leaders: Please click the three vertical dots in the upper right-hand corner and select “make a copy.” Save your own copy to use with your youth.
Beyond the Garden Gate: Activities to do at home
Soil Filtering – Instructions
Soil acts as a natural filter, removing pollutants from the ground water, keeping our water supply clean. Do you think there is a type of soil that may be a more effective filter than others?
Find samples of sand, loam, and clay. Take three plastic bottles with holes drilled in the bottom and fill with equal amounts, one with sand, one with loam, and the last with clay.
Take 3 separate cups of water and fill each with a cup of water. Add a tablespoon of a colored powdered drink (like Koolaid) to each cup, and stir until the drink is dissolved. Add the water to the soil, and watch until the water filters through.
What is the color of the water that filters through the soil? Is the water darkly colored Clear? Why?


