Lesson 4: Seed Germination Experiment
Purpose
Students will understand the function of seeds and the different environmental requirements for seed germination.
Time Needed
1 hour for the initial lesson, followed by 5-10 minutes each day for observation
Materials (For 30 Students)
- 5, 6-inch pots
- Peat-based potting media
- 50 morning glory seeds
- 5 labels
- Sandpaper
- Hot water
- Vinegar
- 1 plastic sandwich bag
- 30 small craft plastic bags
- 30 cotton balls
- Basil seeds
- 30 black bean seeds (from the grocery store)
- String or yarn
- 1 hole punch
- Basil seed germination video clip
Background Information
Seeds are the ripened and fertilized ovules of a plant. In flowering plants, seeds are found within the mature ovary, commonly called the ripe fruit. The type of fruit provides opportunities for seeds to disperse by means of wind, water, animals, or explosion. A fertilized seed contains the embryo from which a new plant will begin to grow. Seeds need proper temperature, adequate moisture, and oxygen to germinate.
Focus Questions
- What does a seed need in order to grow?
- What is seed germination?
- Do all seeds have the same requirements for germination?
- Can plants grow in other ways besides from a seed?
Lesson Slides
Click on “File” and then select “Make a Copy” of the lesson four slide deck to use with your youth.
Scratching the Surface
Instructions
Give each student a pinch of basil seeds and ask, “What is seed germination?” Having them still hold the seeds, watch a short video clip of basil seeds germinating.
What did the students observe? What do they think seeds need in order to grow? List their ideas.
Take a water dropper and squeeze a few drops onto their seeds.
Wait a few minutes and the seed coat should start to break down and form what looks like mucus. Tell the students that the basil seeds are starting to germinate.
To observe the process of seed germination, make a germination necklace:
- Give each student a small craft plastic bag with a hole punched in the top, a cotton ball, and a string.
- Demonstrate dipping the cotton ball into the water, gently squeezing the excess water, and putting the basil seeds on the ball, and slipping it inside the baggie.
- Thread the string through and tie it around the neck.
The germination necklaces will let students observe the basil seed growth.
Dried beans also work very well for this exercise. They are readily available at a grocery store and are big enough to observe easily.
Seed Germination
Watch Nicki Carpenter, Burke County Cooperative Extension Agent with 4-H, make a basil seed germination necklace.
Basil Seed Germination Timelapse
Watch what happens to basil seeds over 7-10 days
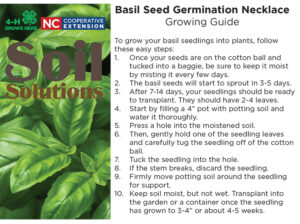
Basil Seed Germination Necklace Care
To grow your basil seedlings into plants, follow these easy steps:
Once your seeds are on the cotton ball and tucked into a baggie, be sure to keep it moist by misting it every few days.
The basil seeds will start to sprout in 3-5 days.
After 7-14 days, your seedlings should be ready to transplant. They should have 2-4 leaves.
Start by filling a 4” pot with potting soil and water it thoroughly.
Press a hole into the moistened soil.
Then, gently hold one of the seedling leaves and carefully tug the seedling off of the cotton ball.
Tuck the seedling into the hole.
If the stem breaks, discard the seedling.
Firmly move potting soil around the seedling for support.
Keep soil moist, but not wet. Transplant into the garden or a container once the seedling has grown to 3-4” or about 4-5 weeks.
Digging In
Instructions
Seeds must be given adequate moisture, oxygen, and a proper temperature for germination to occur. Viable seeds that do not germinate are considered dormant. One type of seed dormancy is found in plants that have hard seed coats, which protect them from germinating in unfavorable conditions.
In order for the seeds to germinate, the hard seed coat must be weakened, so water may be imbibed or taken in by the seed. Gases are also exchanged through the weakened seed coat. The process of removing the hard seed coat is called scarification. In nature, this can happen through freezing temperatures, microbes in the soil, and passing through an animal’s digestive system.
Begin by telling the students that horticulturists use different scarification methods including soaking seeds in hot water, submerging them in an acid, using sandpaper, or even striking them against a hard surface.
The students will set up a scarification experiment to determine the best way to encourage morning glory seed germination.
Divide the class into five groups. Each group will be responsible for one scarification treatment.
Give each group 10 seeds, one 6-inch pot filled with potting media, and a label. Students will also need the supplies for their individual treatments listed in the tab to the right.
After performing the scarification treatment, students will plant the 10 seeds, evenly spaced in the pot. Have them make a hole with their finger about 2-3 cm deep and place the seed inside. Cover gently with soil and water the pot with a sprinkling can.
Scarification Treatments
Treatment 1: Control
- To determine how well the scarification methods work, it is important to first find out how morning glory seeds will germinate without any treatment. This is the control.
Treatment 2: Sandpaper
- Sandpaper mechanically or physically removes part of the seed coat. (This can also be done with a metal file). Have the students lay the sandpaper on a desk and rub the morning glory seeds across a few times. They should just make a nick into the seed coat, not wear it down entirely. Too much sanding might injury the seed embryo inside.
Treatment 3: Percussion
- Percussion is the process of taking seedlings and striking them against a hard surface repeatedly. The idea is to nick part of the seed coat. Put the morning glory seeds into a plastic baggie and have the students strike it against the desk.
Treatment 4: Hot Water
- Hot water will soften the seed coat, making it more permeable to water and gases. Heat a mug of water in the microwave for about 3 minutes (almost boiling). Put the seeds in the hot water and allow them to soak overnight.
Treatment 5: Vinegar
- Vinegar is an acid that chemically breaks down the seed coat. Have students put their seeds into a cup of vinegar and allow them to soak for an hour.
Note: Treatments 4 and 5 should either be done ahead of class—or if the students begin the treatment, they will have to come back and finish their planting at a later time.
Use the attached student sheet to make a hypothesis regarding the results of the experiment. Have the students check on their seeds every day. Every time a change is observed, include a sketch and record the number of seeds that have germinated, height, and any other details.
Seed Scarification Experiment
Use this handout to record your germination data.
Digging Deeper
Instructions
- What happened to the seeds in each treatment?
- How did your hypothesis compare with what you observed?
Make a bar graph of seed germination for each treatment.
- Which treatments had the most seeds germinate? The least? (NC Math Competency 3.02)
Many other seeds have hard seed coats that require scarification. Try this experiment with canna seeds, Kentucky coffee bean, honey locust, or black locust seeds. (Contact your local horticulture extension agent for seed supply ideas.)
- What other factors might affect seed germination?
- What is the evolutionary value to the seed for not germinating in the absence or overabundance of water? At low temperatures?
- Seeds have evolved with survival mechanisms that will inhibit seed germination when the conditions are not favorable. Explore the effects of plant density, planting depth, light (lettuce seeds require red light), or dormancy temperature requirements (stratification). What is the value to the plant for having these limitations?
Have the students think about how seed germination relates to their own lives.
- How does knowing about the process of seed germination help you?
- When would you have had to know about seed germination before?
- Where can you go to get more information about seed germination?
- How could the things you learned today be used in other situations?
Assessment
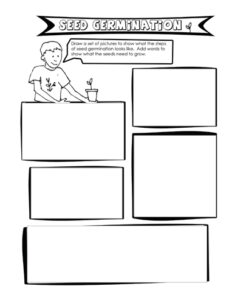
Comic Strip Sequence – Instructions
A cartoon strip sequence allows students to fill in their ideas about the sequence of events in seed germination.
Students should fill in the blank squares with drawings and annotations of the seed germination process. The finished assessment sheets allow you to see the nature and depth of the student’s understanding.
Comic strip sequencing helps learners clarify their thoughts and think about what evidence they have to support their ideas as well as areas in which they are uncertain.
Beyond the Garden Gate: Activities to do at home
Seed Viability
In 1879, William James Beal, a professor of botany at what was then Michigan Agricultural College (now Michigan State University) began an experiment to test how long weed seeds could remain viable or alive. Dr. Beal filled glass jars full of a mixture of dry sand and seeds and then buried them in secret locations around campus. Every few years he would unearth a jar and plant the seeds to see if they would grow.
Today, scientists continue to carry on his experiment and have found that over 100 years later, two types of weed seeds still germinate! Ask students why might this be important. Encourage them to do their own seed experiment and bury a glass jar filled with favorite seeds and sand in their yards or at school.
Ask questions like
- How many types of seeds will you try?
- How many seeds will you bury?
- When will you try to germinate them? Every month? Every year? Every 5 years?
- What do you think will happen?
Sprouting a Sandwich
Some seeds grow very quickly and easily and can actually be eaten! Make a sprouting jar and try different seeds to find out which are the tastiest and how well they grow.
Select from the following seeds: lentils, fenugreek, alfalfa, chickpeas, broccoli, cabbage, and pea. Most of these seeds you can purchase at a health food store.
- Rinse the seeds thoroughly in a strainer and drain.
- Put 1 to 3 tablespoons of seeds into a wide-mouth jar, and cover it with a mesh-like cheesecloth secured with the jar ring or a rubber band.
- Add 1 cup of cool water, and let the seeds soak overnight.
- The next day, drain the water, rinse the seeds, and lay the jar on its side.
- Rinse the seeds two or three times a day, and place the jar out of direct sunlight.
- You may enjoy the sprouts in three to five days when they grow 2 to 4 centimeters long.
- After they are ready to eat, cover the jar with a lid or plastic wrap and keep it in the refrigerator.
- Add sprouts to a salad, a sandwich, or just eat from the jar. It is very important to rinse the sprouts as they are growing. Keep a close watch to make sure mold doesn’t develop. Mold likes light, warm temperatures, and moisture. If mold grows, throw the seeds away and try again!


