Lesson 3: Soil and Plant Growth
Purpose
Using skills of observation, comparing, classifying, and communicating, students will discover the different characteristics of soil and how soil properties impact their daily life. Students will explore the relationship between soils on plant growth.
Time Needed
1 hour
Materials
- Seeds: peanuts, cotton, corn, wheat, soybean, and tomato
- Soil: collected from the school or from home (consider using the same soil the students tested in lessons 1 & 2)
- 12 6-inch pots
- Pot labels
- Rulers that measure centimeters
- 1 package pH paper (may order from Carolina Biological Supply)
- Nutrient test for nitrogen, phosphorous, and potassium (available from a local garden or science supply store)
- Soil Sample Box (available for free through county Extension Service)
- See additional materials in the following lessons:
- Soil Properties
- Soil and Water Relationships
Background Information
Agriculture remains one of North Carolina’s most important industries. Throughout the state, a number of different agronomic crops like corn, cotton, soybeans, and wheat are grown. So are a diverse number of horticultural crops like apples, pecans, blueberries, strawberries, grapes, cucumbers, melons, okra, landscape ornamental shrubs, annual and perennial flowers, and even Christmas trees. Different parts of the state have environmental conditions suitable for growing specific plants. Much of the variation in the crops grown can be traced to the different types of soils – sandy loams of the coastal plains, organic soils in eastern parts of the state, the more clayey texture of the piedmont, and the varying types of soils in the mountains. Other environmental conditions that play a role in plant growth include the amount of light, nutrients, moisture level, and temperature.
Focus Questions
- How does soil influence plant growth?
- Why do certain plants grow better in some soils than others?
Lesson Slides
Lesson Three Slides
Click on “File” and then select “Make a Copy ” of the lesson three slide deck to use it with your youth.
Scratching the Surface
Instructions
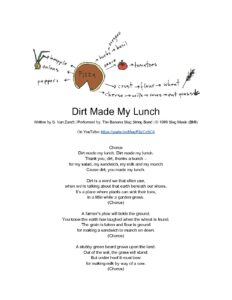
Ask the students what they had (or are going to have) for lunch. Ask them if they knew that soil was responsible for everything they eat. Invite the music teacher (or do it yourself) to teach students the song “Dirt made my lunch” by the Banana Slug String Band. Invite the students to create imaginative movements with their bodies. After dancing and singing, have them reflect on the experience.
Ask questions like:
- In the song, what do we eat that comes from the soil?
- What did you like about the song?
- How did it make you feel?
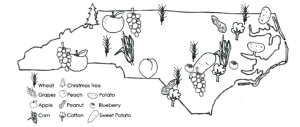
As a whole group, brainstorm some of their favorite foods and trace the foods back to the plants that make the ingredients. For example, a student might say pizza is a favorite food. Ask the students to tell what plants we must grow in order to make pizza: peppers, tomatoes, herbs, wheat, forage grasses for cows, etc. Once you have generated a good list, ask the students how many of these plants grow in North Carolina. Circle the North Carolina grown plants. How many are grown in your county? Visit the North Carolina Department of Agriculture and Consumer Service Web site to find out which crops are grown in your county. Put a square around these plants. Show students the North Carolina agriculture map at the end of this lesson. Point out that while many food crops are grown throughout North Carolina, some grow only in specific areas of the state. Have them make observations about what they find.
Ask questions like:
- Why do potatoes grow best in the east?
- Why do apples grow mainly in the mountains?
- What is it about the soils in the area that support certain plants but not others?
- Why can some crops grow all over the state?
- When do we grow these plants?
- What other environmental factors may play a role?”
- Why do potatoes grow best in the east?
- Why can some crops grow all over the state?
Eaten Any Soil Lately?
Join Lee County Cooperative Extension to explore how soil is critical for everything we eat!
NC Agriculture Map
Use the map of different agricultural crops across the state of North Carolina. Have your youth describe any observations they can make about the map. You might ask:
- Why are only peanuts growing in the east?
- Why do Apples only grow in the mountains?
Soil and Plant Growth Video
Join the Durham County Extension Master Gardeners as they share the set up of the plant growth experiment with soil.
Digging In
Instructions
Ask students how we might find out what plants will grow well in their area. Collect enough local soil to fill 12 6-inch pots. You may consider using the same soil you tested in lesson 1&2. Have the students investigate the soil to determine how the soil characteristics might influence plant growth. Then have them fill the 6-inch pots.
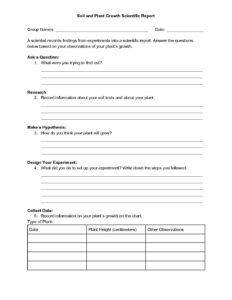
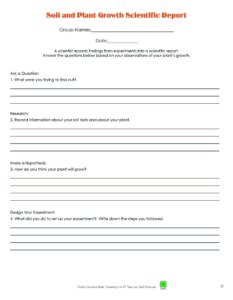
Perform some simple soil tests and record your findings on the Soil and Plant Growth Scientific Report (found at the end of this lesson):
- Soil texture. Have students perform hand-texturing tests and the soil shimmy (learned in Lesson 1: Soil Properties) to determine the kind of soil you have.
- Drainage test. Have students perform the tests they learned in Lesson 2: Soil and Water Relationship to determine how well their soil drains and retains water.
- Nutrient availability. To find out if nutrients are available for plant uptake, measure the soil pH. pH is a measurement of the acidity or alkalinity of a soil. pH determines whether nutrients can be released to the plants. Most plants prefer to grow in soil with a pH range from 6 to 7. If your soil has a pH of 4, for example, your plant may grow poorly and the adult plant may be stunted because it cannot get the nutrients from the soil that it needs to grow.
- Obtain pH paper from a science supply store. Dip the paper into moist soil; the pH paper will change color. Compare the color of your pH paper to the colored chart included with the package. Each color aligns with a different pH.
- Nitrogen, potassium, and phosphorous are common nutrients needed by plants. By performing a soil nutrient test, students can determine the amounts of these nutrients that are present. The pH level determines if they are available. If any of these nutrients are present in low amounts, it could cause the plant to not grow well. Obtain a soil nutrient testing kit from a local garden center or commercial science education supply store (like Carolina Biological Supply).
- Send a soil sample to the local North Carolina county Extension Center to be analyzed for free by the North Carolina Department of Agriculture. The results give recommendations for fertilizer and lime treatments. Download a guide from the NC State University Soil Science Department on properly collecting soil samples. Your local county Extension agent can help interpret the results.
Soil and Plant Growth Report
Provide youth this handout to record plant growth measurements and observations.
Soil pH Testing
Learn how to measure soil pH with a simple test that you can use with your garden soil.
How to Collect a Soil Sample
Join NC Cooperative Extension to learn how to properly take a soil sample that you can test yourself or send in to the Soil Testing Lab with North Carolina Department of Agriculture and Consumer Services.
Soil Nutrient Testing
Learn how to use a rapid soil test to measure nitrogen, potassium, and phosphorus in your soil.
Digging Deeper
Instructions
Have students ask your local county Extension agent for recommendations on what crops to grow and where they might find seeds. Students may consider growing:
- Corn
- Tomatoes
- Eggplants
- Wheat
- Peppers
- Radish
- Soybeans
- Lettuce
- Greens
- Peanuts
- Melons
- Cucumbers
Have the group choose six different plants to grow. Divide the class into six groups, assigning each group a type of plant. Each group should work together to plant two pots of their agricultural crop. Place plants in a sunny spot or under a grow light. Continuing with the Soil and Plant Growth Scientific Report worksheet, have them record a hypothesis. Do they think their plants will grow well? Why or why not? Groups can also follow up with further research on their plants and include what they learned on the worksheet.
Students should make weekly observations on the plant growth. They might sketch and write down descriptive details. After the plants have grown for eight weeks (or longer) start a summary discussion on the plant performance. Ask questions like,
- How well did the crops grow?
- Why did the plants grow well or poorly?
- What properties of soil contributed to growth?
- How might we change the soil so plants could grow better?
Have students complete their group’s report of their scientific investigation on their worksheet. Conclude the experiment by helping the group to reflect on the experience.
Ask questions like,
- What did you do to plan and conduct the experiment?
- What did you learn about conducting an experiment?
- What did you learn about making decisions?
- Where can you go to find resources to help you make further decisions about what plants you might like to grow?
- How will your new skills help you at home?”
Assessment
Scientific Report – Instructions
A scientific report allows students to follow the scientific method and outline their understanding of the soil and plant growth process. It permits you to see areas of strength and challenge and help direct further scientific inquiries. Tell students that a scientific report is the same written document that scientists create to let other people know their findings. (They’ve been filling it out all along.)
Beyond the Garden Gate: Activities to do at home
Peanut Butter – Instructions
- 2 cups roasted shelled peanuts
- 1 tablespoon peanut oil
- Salt to taste
With help from an adult, combine peanuts and oil in a food processor fitted with a metal blade. Process for two to three minutes, stopping to scrape down the sides with a spatula. Add salt to taste. Store in an airtight container in the refrigerator. If oil rises to the top, simply stir before eating.
* Safety Note: peanuts are an allergen. Do not do this activity if you are allergic to peanuts.
Finger Spinning Cotton – Instructions
Before cotton is made into clothing, it must first be spun. Machines usually do the spinning, but you can use your fingers to form a rough thread. Ask your local Extension agent for a cotton boll (from a cotton plant), or you can work with a cotton ball. (The actual cotton boll works better.) Carefully spread the cotton into a fluffy cloud, removing the seeds. Keep your cloud in one piece, and hold it in your left hand or whichever hand feels most comfortable.
To spin into the thread, pinch a bit of the cotton between your finger and thumb, and gently twist it. Continue twisting in the same direction, slowly pulling away from the cotton cloud. Pull more cotton, continually twisting, and you should see the thread start to form. Keep a firm grip on the twist, to prevent it from unwinding. This is hard. You may need to tape it down. If you end up with a nice thread, wind it onto a skewer, chopstick, or pencil.
Resources: North Carolina Department of Agriculture Crop Summaries by county.

